
Need to extract text from a PDF in Power Automate? You’re not alone. It’s one of the most searched automation tasks, and for good reason. Whether you’re processing invoices, parsing resumes, or pulling data from contracts, getting text out of PDFs is the backbone of document automation.
In this guide, we’ll cover everything from the built-in Power Automate actions to handling the tricky cases (scanned PDFs, images, messy layouts) where native tools fall short. We’ll also show you how to plug in AI-powered extraction using ParserBee’s API to get clean, structured JSON data — all without writing a single line of code.
Short on time? You do not need a Flow to extract data from a PDF. ParserBee’s free browser tools do it in seconds with AI: try the free bank statement converter or the free resume parser. First parses are free, no signup, works on scanned files.
The Flow at a Glance
The complete working flow is four steps:
- Trigger — “When a file is created” (SharePoint) or “When a new email arrives” (Outlook)
- HTTP action — sends the PDF to ParserBee’s extraction API
- Parse JSON — turns the response into fields your flow can use
- Use the data — add an Excel row, post to Teams, create a Dataverse record
Jump straight to the step-by-step setup ↓ or start with the native options below if you only need raw text from digital PDFs.
We’ve also put together a complete guide to Zapier PDF data extraction if you use Zapier instead of Power Automate, or visit the ParserBee blog for other guides.
Power Automate offers different tools for each of these scenarios. The right approach depends on what kind of PDF you’re working with and what you want to do with the extracted data.
Method 1: Using the Built-in “Extract Text from PDF” Action
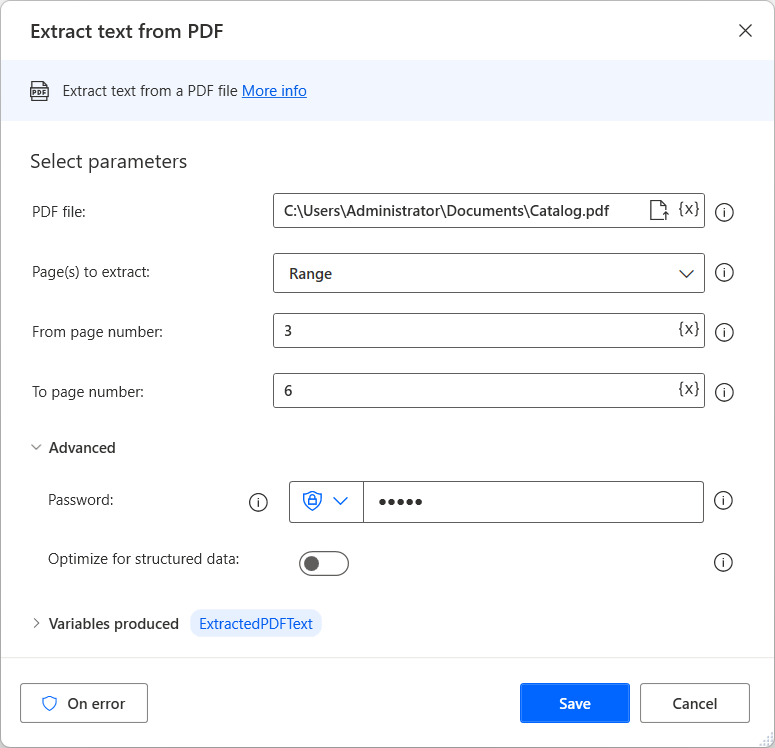
Power Automate Desktop includes a native “Extract text from PDF” action. Here’s how to use it:
Steps:
- Open Power Automate Desktop and create a new flow
- Add the “Extract text from PDF” action
- Set the PDF file path (from a local folder, SharePoint, OneDrive, etc.)
- Choose the page range (all pages or specific pages)
- Run the flow – the extracted text is stored in a variable
What It Does Well:
- ✅ Works great for digitally created PDFs (from Word, Excel, Google Docs, etc.)
- ✅ Fast and free. No premium connectors needed
- ✅ Simple to set up for basic text extraction
What It Doesn’t Do:
- ❌ Cannot read scanned PDFs or image-based documents
- ❌ Returns raw unstructured text. No field-level data extraction
- ❌ No support for extracting data from images (PNG, JPEG, WebP)
- ❌ Struggles with complex layouts, multi-column PDFs, and tables
Bottom line: If your PDFs are digitally generated and you just need the raw text, this built-in action works fine. But if you need structured data or have scanned documents, keep reading.
Quick way to check: upload your file to ParserBee’s free browser tools. If our AI reads your scan, the paid connector will too, and you will see exactly which fields come out.
Method 2: Using AI Builder for Scanned PDFs and Images
For scanned PDFs and image-based documents, Power Automate offers AI Builder — Microsoft’s AI add-on that includes OCR (Optical Character Recognition).
Steps:
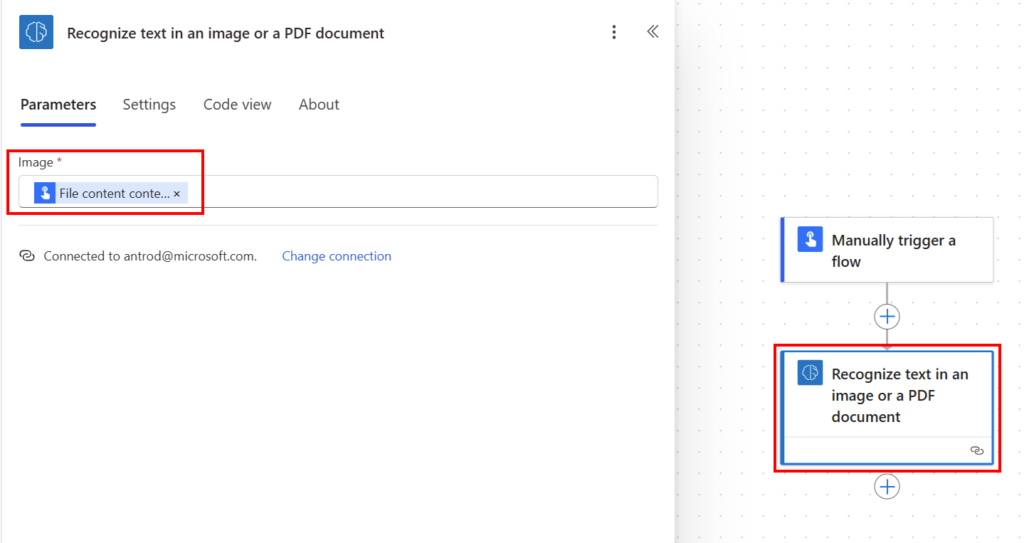
- In your cloud flow, add the “Recognize text in an image or PDF document” action (AI Builder)
- Provide the file content from your trigger (e.g., “When a file is created in SharePoint”)
- AI Builder uses OCR to read the text
- Access the extracted text in subsequent actions
What It Does Well:
- ✅ Can read text from scanned PDFs and images
- ✅ Integrates directly into cloud flows
What It Doesn’t Do:
- ❌ Requires a premium license (AI Builder credits)
- ❌ Returns raw OCR text. Still no structured data extraction
- ❌ Accuracy varies significantly based on document quality
- ❌ Slow processing. Large PDFs can take minutes or even hours
- ❌ Has file size and page count limits
- ❌ Cannot extract data from forms or extract specific fields
The catch with both native methods: they hand you a raw block of text, not usable data. To pull out an invoice number, a date, or a total, you’re left writing fragile regex patterns and string functions that break the moment a layout changes. Scanned documents either return nothing (native action) or inconsistent OCR text at premium cost (AI Builder). And neither offers template-based extraction for documents you process every day.
This is exactly the gap that ParserBee fills – and it works right inside your Power Automate flows.
Method 3: Using ParserBee API in Power Automate (Recommended)
ParserBee is an AI-powered document parsing platform that extracts structured data from any document – PDFs, scanned documents, images and phone photos (PNG, JPEG, WebP, HEIC), Word, PowerPoint, Excel, CSV, text, HTML and email files (.eml) – and returns clean JSON output.
The best part? You can call ParserBee’s API directly from Power Automate using the HTTP connector. No coding required.
How It Works:
- Create a template on ParserBee – define the exact fields you want to extract (e.g., invoice_number, date, total_amount, line_items)
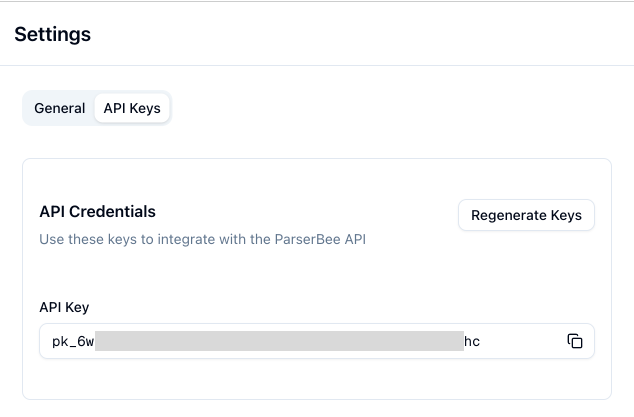
- Copy your API key (created automatically when you sign up) from Settings, API Keys
- Add an HTTP action in Power Automate to call ParserBee’s extraction API
- Get structured JSON back – ready to use in your flow
Not sure you need an automated flow at all? If your documents arrive in batches rather than one by one in real time, you can skip Power Automate entirely. ParserBee’s Data Lab lets you drag up to 100 documents into the dashboard, extracts them all with your template, and exports the results to Excel, CSV or Google Sheets. No flow, no HTTP action, and no Power Automate Premium licence needed.
What Makes ParserBee Different:
| Feature | Native Power Automate | AI Builder | ParserBee API |
|---|---|---|---|
| Digital PDFs | ✅ | ✅ | ✅ |
| Scanned PDFs | ❌ | ✅ (with limits) | ✅ |
| Images (PNG, JPEG, WebP) | ❌ | ✅ (with limits) | ✅ |
| Word, Excel, CSV and email files | ❌ | ❌ | ✅ |
| Structured JSON output | ❌ | ❌ | ✅ |
| Custom extraction templates | ❌ | Limited | ✅ |
| Multi-record extraction | ❌ | ❌ | ✅ |
| Nested/complex fields | ❌ | ❌ | ✅ |
| Works in Power Automate | ✅ Native | ✅ Native | ✅ Via HTTP connector |
| No-code setup | ✅ | ✅ | ✅ |
| Pricing | Free | Premium (AI Builder credits) | Free tier available |
Get started with ParserBee for free →
Step-by-Step: Set Up ParserBee in Power Automate
Here’s exactly how to set up AI-powered document extraction in your Power Automate flow using ParserBee. No coding required.
Step 1: Create Your ParserBee Account and Template
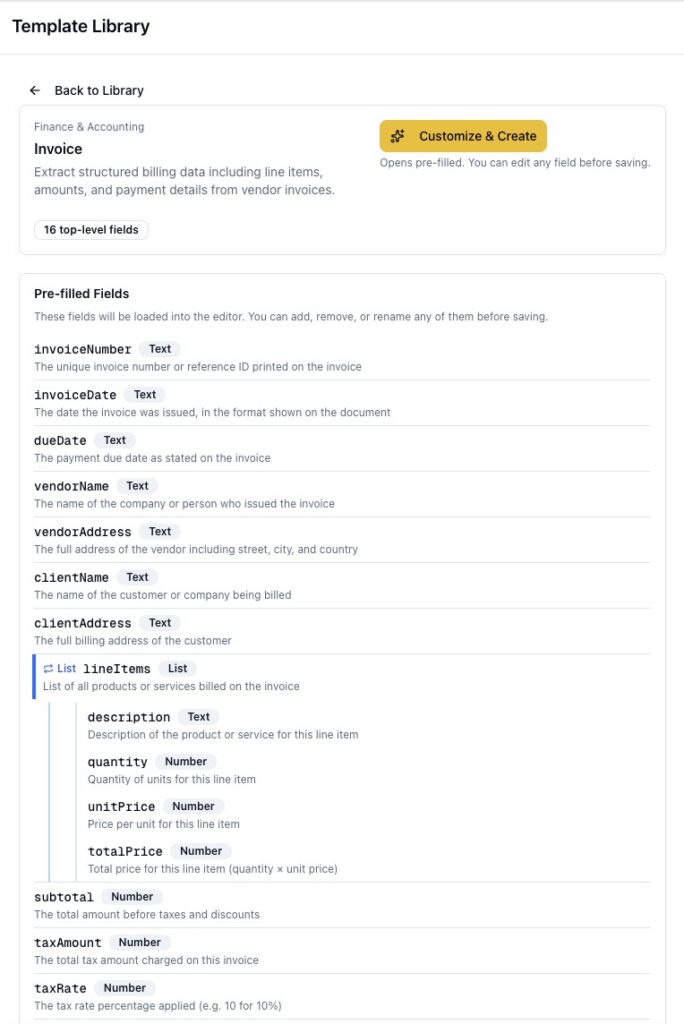
You do not have to build the template from scratch. The Template Library in the dashboard sidebar includes more than 80 ready-made templates, including an Invoice template: open it, click Customize & Create, and the fields arrive pre-filled for you to review, adjust and save. The steps below show the manual route, and the field descriptions apply either way.
- Go to app.parserbee.com and create a free account
- Navigate to Dashboard → Create Template
- Give your template a name (e.g., “Invoice Extraction”)
- Add the fields you want to extract. For an invoice, you might add:
invoice_number(string)date(string)vendor_name(string)total_amount(number)line_items: set the Field Type to List (Repeating Rows). An invoice usually contains several rows of products or services; a List field tells ParserBee to extract every row as its own entry, one per line item, instead of only the first one. Inside the List, add three fields:description(Text),quantity(Number),unit_price(Number).
- Click Create Template and note down the Template ID
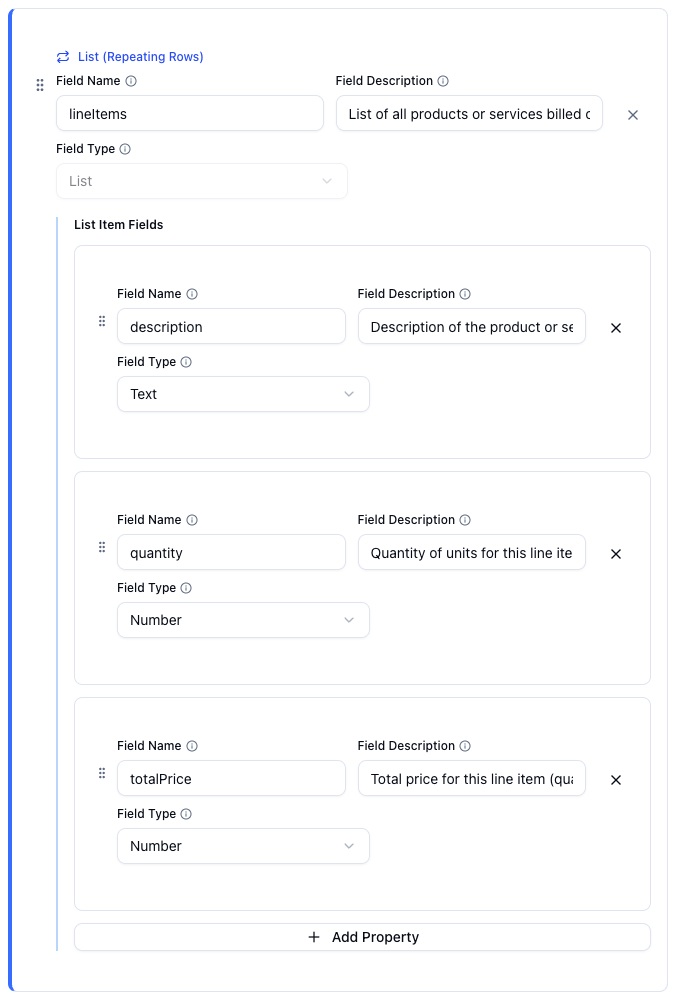
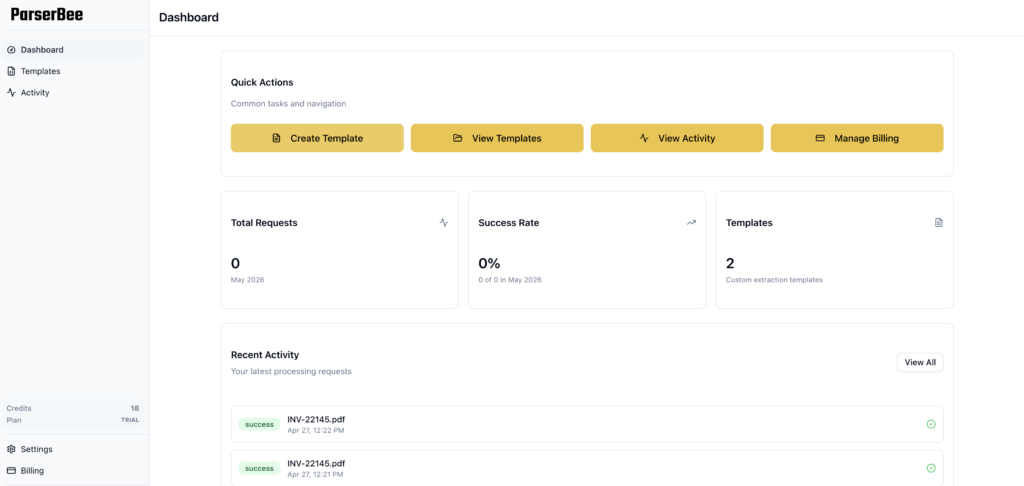
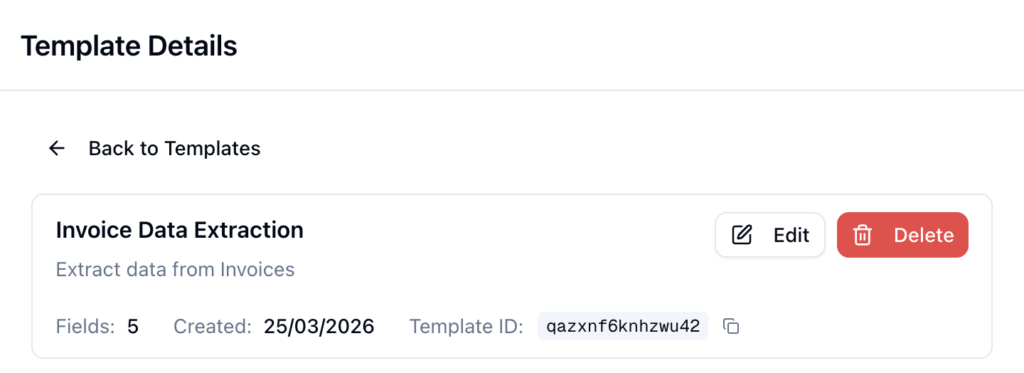
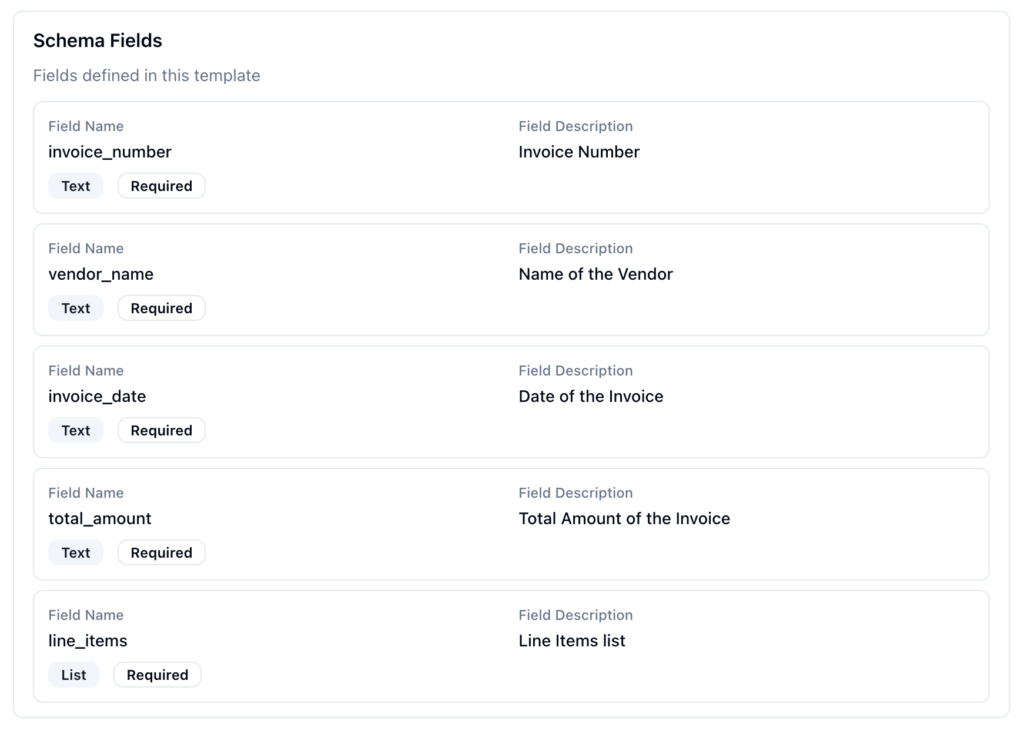
The most important part: write a clear description for every field
ParserBee’s AI decides what to extract by reading your field descriptions. A vague or empty description is the single most common reason for poor extraction results. Write each description as if you were explaining to a new assistant where to find the value on the document.
Here are ready-to-use descriptions for the invoice template above. Copy them into the Field Description box as you create each field:
| Field | Description to paste |
|---|---|
| invoice_number | The unique invoice number printed near the top of the invoice, usually labelled Invoice No, Invoice # or Reference. Example: INV-2026-0342 |
| date | The date the invoice was issued, usually printed near the invoice number. Return it in YYYY-MM-DD format. |
| vendor_name | The name of the company that issued the invoice, usually shown in the header or logo area at the top. |
| total_amount | The final total payable including tax, usually the last and largest amount at the bottom of the invoice. A number only, without currency symbols. |
| line_items | The table of products or services on the invoice. Each row of the table is one item. |
| line_items: description | The name or description of the product or service in this row of the invoice table. |
| line_items: quantity | The quantity in this row of the invoice table. A number only. |
| line_items: unit_price | The price per unit in this row of the invoice table. A number only, without currency symbols. |
Adapt the wording to your own documents: mention the label the value appears under, where it sits on the page, and the format you want back. The clearer the description, the more accurate the extraction.
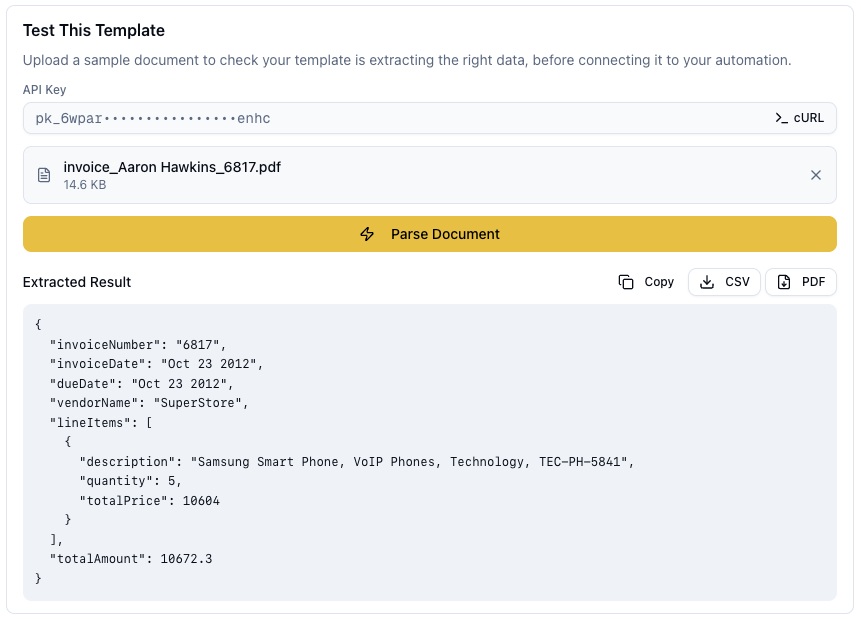
Test before you build the flow: open your saved template and use the built-in test panel to upload one sample invoice. You will see the extracted results in seconds. If a field comes back empty or wrong, improve its description and test again. Getting the template right here is far faster than debugging it inside a Power Automate flow later.
Step 2: Build Your Power Automate Flow
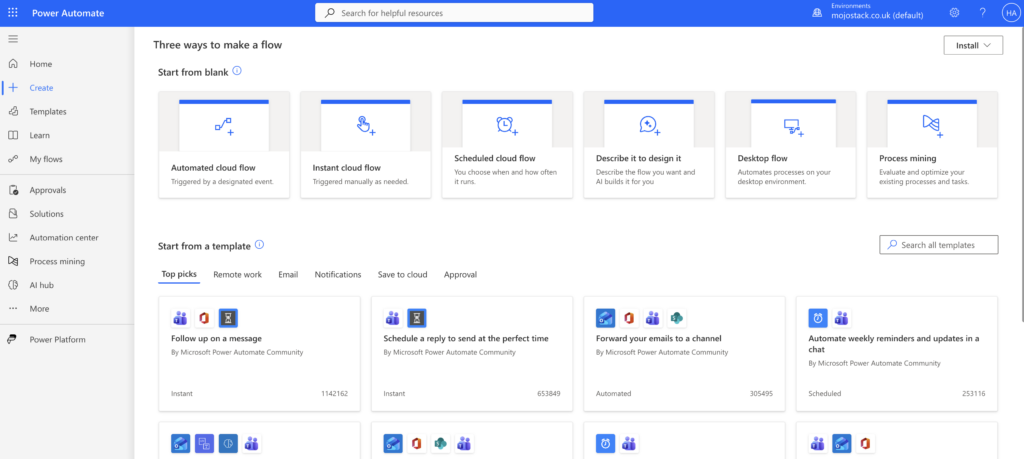
Here’s the flow structure:
2a. Set Up Your Trigger
Choose a trigger based on your use case:
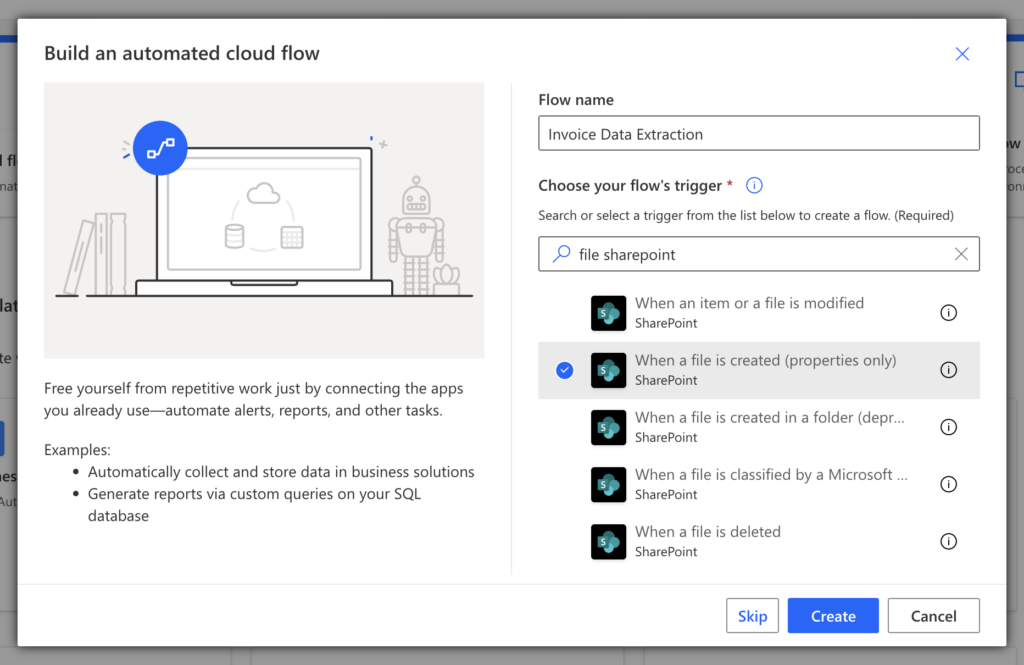
- “When a file is created (SharePoint)” – for documents uploaded to SharePoint
- “When a new email arrives (Outlook)” – for email attachments
- “Manually trigger a flow” – for testing
2b. Add the HTTP Action to Call ParserBee
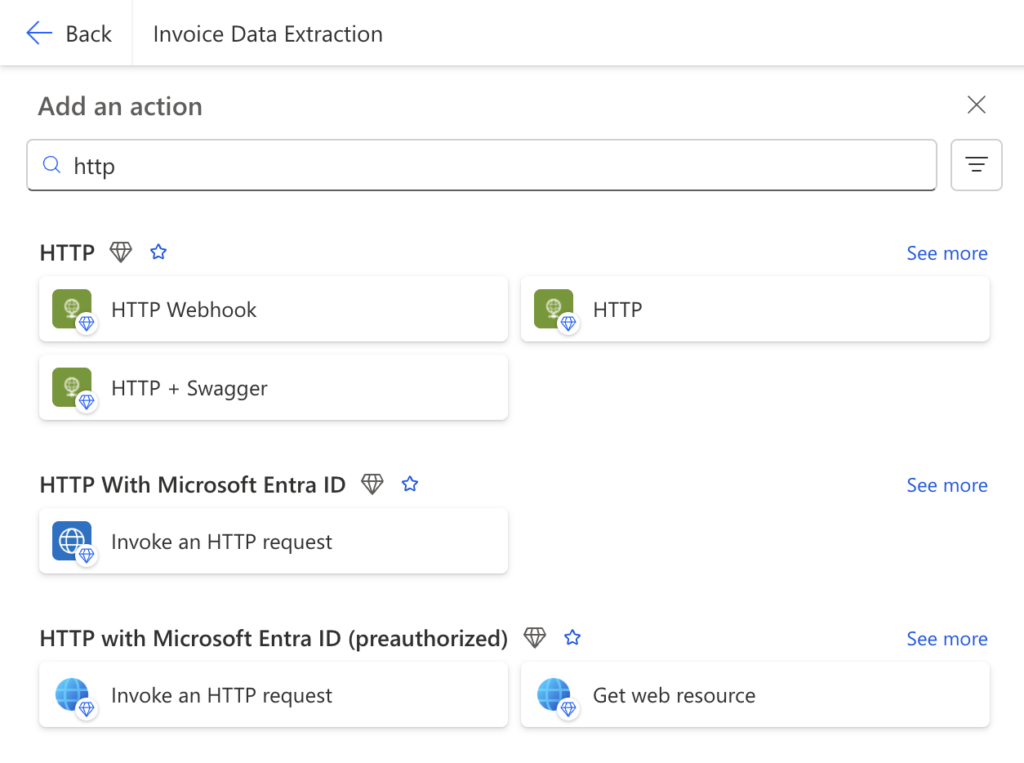
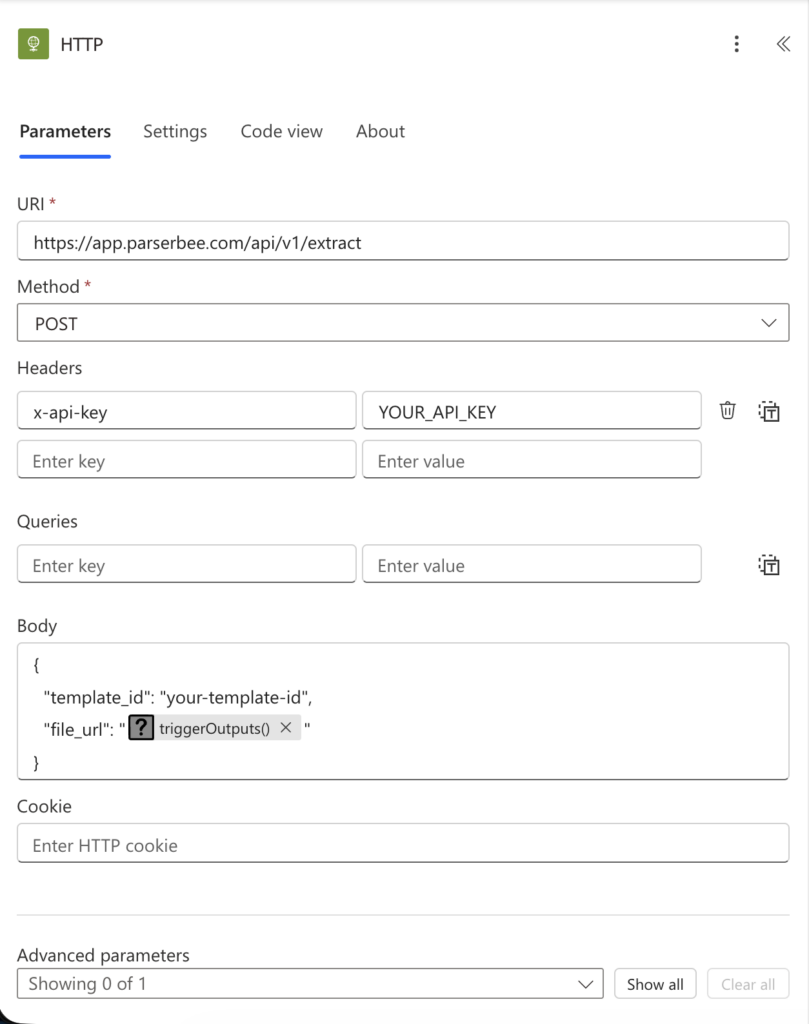
- Add a new action → Search for “HTTP” → Select “HTTP” (premium connector)
- Configure it as follows:
Method: POST
URI: https://app.parserbee.com/api/v1/extract
Your API key was created automatically when you signed up. Find it in the ParserBee dashboard under Settings, API Keys, and use the copy button next to the key.
Headers:
| Key | Value |
|---|---|
x-api-key | your-parserbee-api-key |
Body (using file_url):
If your file is accessible via a URL (e.g., SharePoint link):
{
  "template_id": "your-template-id",
  "file_url": "@{triggerOutputs()?['body/MediaUrl']}"
}
Body (using file upload):
If you want to upload the file directly, change the content type to multipart/form-data and include:
template_id: Your template IDfile: The file content from your trigger
2c. Parse the JSON Response
- Add a “Parse JSON” action after the HTTP step
- Use this schema:
{
  "type": "object",
  "properties": {
    "success": { "type": "boolean" },
    "request_id": { "type": "string" },
    "data": { "type": "object" },
    "credits_remaining": { "type": "integer" },
    "processing_time_ms": { "type": "integer" },
    "usage": {
      "type": "object",
      "properties": {
        "pages_processed": { "type": "integer" },
        "doc_size_bytes": { "type": "integer" }
      }
    }
  }
}
2d. Use the Extracted Data
Now you can use the extracted fields anywhere in your flow:
- Save to Excel or SharePoint – Map each field to a column
- Send an email notification – Include the extracted data in the email body
- Create a record in Dynamics 365 or Dataverse – Populate fields automatically
- Post to Microsoft Teams – Notify your team with the extracted information
- Update a database – Write data to SQL Server or any connected system
Get started with ParserBee for free →
Use Case Examples
The same four-step flow handles most business documents. Change the template and the trigger, and everything else stays identical:
| Use case | Trigger | Template fields | Next step in flow |
|---|---|---|---|
| Invoice processing | New PDF in SharePoint | invoice_number, vendor_name, invoice_date, total_amount, line_items (List) | Add row to Excel, send approval email |
| Resume/CV parsing | Candidate upload via Microsoft Forms | name, email, phone, work_experience (List), skills (List) | Create record in ATS or SharePoint list |
| Receipt extraction | Employee forwards receipt via email | merchant_name, date, total, payment_method | Add row to expense sheet |
| Contract parsing | New contract in SharePoint folder | parties (List), effective_date, expiration_date, contract_value | Create tracker record, set renewal reminder |
Receipts work even from phone photos (JPEG, PNG, HEIC) and scanned PDFs. Ready-made templates for all four document types are available in the Template Library.
Want to see the output before building anything? Try it on a real resume, a bank statement, or an invoice right in your browser.
What a response looks like – here is the JSON ParserBee returns for the invoice example:
{
  "success": true,
  "data": {
    "invoice_number": "INV-2026-0342",
    "vendor_name": "CloudTech Solutions",
    "invoice_date": "2026-03-10",
    "total_amount": 4950.00,
    "line_items": [
      {
        "description": "Cloud Hosting (March 2026)",
        "quantity": 1,
        "unit_price": 3000.00
      },
      {
        "description": "Technical Support Package",
        "quantity": 1,
        "unit_price": 1500.00
      }
    ]
  },
  "credits_remaining": 487,
  "processing_time_ms": 2340
}
ParserBee vs Native Power Automate PDF Extraction
Here’s a side-by-side comparison to help you decide:
When to Use the Native “Extract Text from PDF” Action:
- ✅ Your PDFs are always digitally generated (never scanned)
- ✅ You only need the raw text as a block of unformatted content
- ✅ You have a simple, consistent document layout
- ✅ You are comfortable writing regex or string operations to parse the output
When to Use ParserBee API:
- ✅ You need structured JSON data – not raw text
- ✅ You process scanned PDFs or image-based documents
- ✅ You want to extract data from images (PNG, JPEG, WebP)
- ✅ You need to handle complex layouts, tables, or multi-page documents
- ✅ You want a template-based approach – define fields once, extract automatically
- ✅ You need nested data structures (e.g., line items on an invoice)
- ✅ You want to process the same document type repeatedly with consistent results
- ✅ You want a no-code solution that doesn’t require regex or string manipulation
Supported File Types
ParserBee supports all the common document formats you’ll encounter:
| Format | Extension | Use Case |
|---|---|---|
.pdf | Invoices, contracts, reports, resumes | |
| PNG | .png | Screenshots, scanned documents, captured images |
| JPEG | .jpg, .jpeg | Photos of receipts, ID cards, documents |
| WebP | .webp | Web-optimized document images |
| HEIC | .heic | Photos taken on iPhone and modern smartphones |
| Word | .doc, .docx | Letters, reports, contracts, agreements |
| PowerPoint | .ppt, .pptx | Slide decks and presentations |
| Excel | .xls, .xlsx | Spreadsheets, financial data, tabular reports |
| CSV | .csv | Exported data, tables, bulk records |
| Text | .txt | Plain text documents and notes |
| HTML | .html, .htm | Web pages and saved online documents |
.eml | Email messages and their attachments |
Maximum file size: 50 MB
Frequently Asked Questions
Can I use Power Automate to extract text from a scanned PDF?
Yes, but not with the built-in “Extract text from PDF” action – that only works for digitally created PDFs with selectable text. For scanned PDFs, you have two options:
- AI Builder – Microsoft’s OCR add-on (requires premium license, returns raw text only)
- ParserBee API – AI-powered extraction via the HTTP connector (returns structured JSON data, free tier available)
Can Power Automate extract text from images?
The built-in PDF actions don’t support images. You can use AI Builder’s “Recognize text in an image” action (premium), or call the ParserBee API which supports PNG, JPEG, and WebP images natively.
How do I extract specific fields (like invoice number or date) from a PDF in Power Automate?
The native actions only return raw text – you’d need to write string functions or regex to parse individual fields. With ParserBee, you define the exact fields you want in a template, and the API returns them as a structured JSON object. No string parsing needed.
What happens if the PDF has tables?
ParserBee handles tables natively. You can define array-type fields in your template (e.g., line_items as a LIST which works as an array of objects), and ParserBee will extract each row as a structured object with the fields you specified.
Is the HTTP connector in Power Automate a premium connector?
Yes, the HTTP connector requires a Power Automate Premium license. However, if you’re processing PDFs at any meaningful scale, you likely already have a premium plan. Power Automate Desktop users can call the same API with the “Invoke web service” action instead. And if you do not have a Premium licence at all, ParserBee’s Data Lab covers batch processing entirely in the browser, with no connector needed.
Is ParserBee free to use?
ParserBee offers a free tier with credits to get started. You can create templates, generate an API key, and start extracting data immediately. Paid plans are available for higher volume usage.
Conclusion
Extracting text from PDFs in Power Automate doesn’t have to be painful. Here’s the simple decision tree:
- Digital PDFs + raw text only? → Use the built-in “Extract text from PDF” action
- Scanned PDFs or images? → You need OCR – either AI Builder (premium, raw text) or ParserBee (structured data)
- Need structured data (specific fields)? → Use ParserBee API via the HTTP connector – it’s the only option that gives you clean JSON without writing regex
- Have a batch of files and no real-time trigger? → Upload them to ParserBee’s Data Lab and export straight to Excel. No flow needed.
ParserBee works inside your existing Power Automate flows. There’s nothing to migrate, no workflows to rebuild. Just add one HTTP action, point it at ParserBee’s API, and you’ll go from raw blobs of text to structured, usable data in seconds.
Not ready to create an account? Start with the free tools instead: the bank statement converter and the resume parser run right in your browser, no signup, and show you exactly what ParserBee extracts.
Get started with ParserBee for free →
Have questions about using ParserBee with Power Automate? Reach out to us at [email protected] – we’re happy to help you set up your first flow.
Table of Contents
How to Stop Manual Data Entry from PDF to Excel (For Non-Technical Teams)
data extraction, Excel, No Code, PDF extraction
10 Best Invoice OCR Software in 2026 (Tested on Real Invoices)
Comparisons, data extraction, Invoices, No Code
Bank Statement to Excel Software: The 6 Best Tools in 2026
Bank Statements, Comparisons, No Code